4.1.1 Create a field (columns)
To create new columns in the company list (add a new filed to the company card), go to the CRM admin and select Site Columns under the Administration tab to open the site columns page of the site.
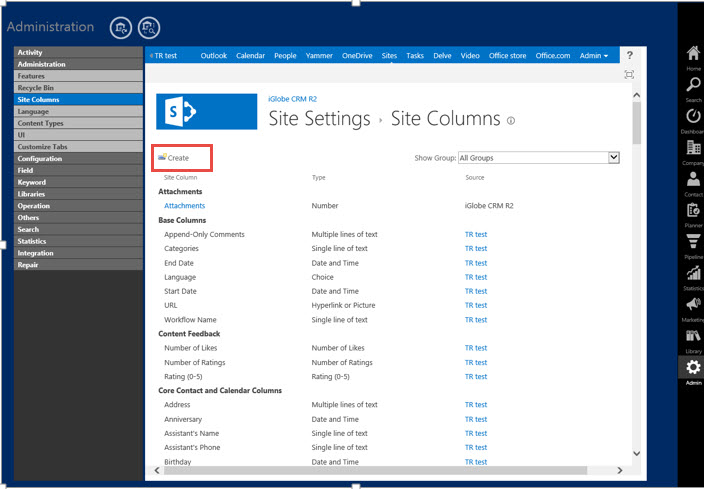

Click the Create link to create a new custom column (filed).
- Type the name of your column in the “Column name” field.
- Select column type from the column type list.
- Write the description of the field (Optional)
- Select “Yes” from required section if you want to make this field required (If you already have, any data in the list then do not check true, it will not work accordingly).
- Select “Yes” from unique section if you want to make this field unique (It is better not to make field unique as it makes list slower, because it does indexing).
- Write the maximum number of character that you want to add in text box in Maximum number of character section.
- If you want to set column validation, expand Column validation section, write validation formula in formula box, write validation message in user message box.
- Write the number of lines you want to show in Multiline text field.
- For multiline text column, select the type of text you want to show in text box (In our app we have plain text only).
- For Choice column, write the name of the choice list in “Type each choice on a separate line” section.
- Select display type of your choice field form “Display choices using” section.
- If you want to auto fill then select “Yes” from Fill-in” section.
- For Lookup Type Column select the list name, whose data you want to show in the column in “Get Information from” section.
- Select the name of the field of the selected list that you want to show in the column.
- Check Allow Multiple value if you want to add multiple value from the parent list in the column [Leave the section “Add a column to show each of these additional fields” alone as we did not implement this feature yet.].
- For lookup field Check “Enforce relationship behavior”, then it will allow you to set relationship behavior with parent list.
- Uncheck Add to all content types. [!Important]
- Click Ok Button to add the column in the list.
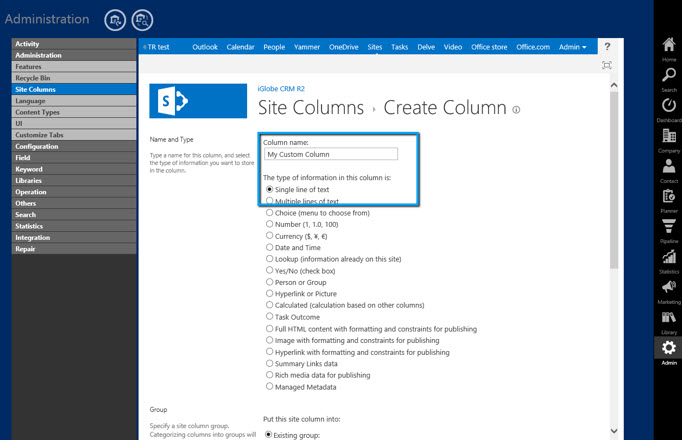
Type the name of your column (field) in the “Column name” field and select column type from the column type list.
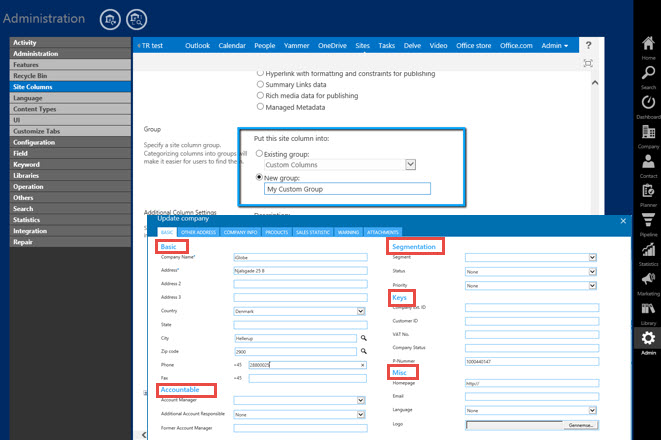
The field can be placed under existing sections on the company card or in new section that you create. NOTICE! The first time you add a new filed (column) you will no be able to see the iGlobe CRM group label in the drop downlist of the existing group. You will thefore need to select the New group radio button and type in the iGlobe CRM group name that you want the custom field to show up under. Note : This is very important as the selection of group decides the heading for the section that the custom field would show up. If you want to add a second filed into the same group, then you will be able to find the group name in the drop downlist of Existing group.
You will find the iGlobe CRM group name in the bottom of this page.
After entering all the information, click on the OK button to create the new custom column. Or you can always click the Cancel button to close the form discarding any changes made.

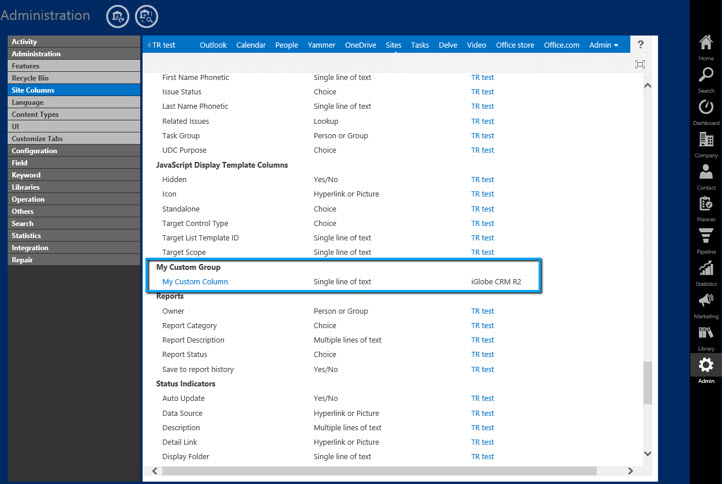
The new custom column can be found under the newly created group in the site column list.
You have now successfully created a new field. Now you want to add the new field into a specific tab on the company form. To do that you must first change the settings of the default content types in the company list.
iGlobe CRM – Default group names
List of default group names in iGlobe CRM application for the different columns in different lists:
CRM Company List |
|
|
Display Name |
Original Name in App |
|
Basic |
Basic |
|
Accountable |
Accountable |
|
Segmentation |
Segmentation |
|
Keys |
Keys |
|
Misc |
Misc |
|
Billing Address |
Billing Address |
|
Shipping Address |
Shipping Address |
|
Trade Information |
Trade Information |
|
Company Group |
Company Group |
|
Products |
Products |
|
Sales Statistic |
Sales Statistic |
|
Comments |
Comments |
|
Attachments |
Attachments |
CRM Contact List |
|
|
Display Name |
Original Name in App |
|
Basic Personal |
Basic Personal |
|
Basic Others |
Basic Others |
|
Profile Picture |
Profile Picture |
|
Private Address |
Private Address |
|
Marketing Information |
Marketing Information |
|
Personal Information |
Personal Information |
|
Private Notes |
Private Notes |
CRM Contract List |
|
|
Display Name |
Original Name in App |
|
Basic |
Basic |
|
Status |
Status |
|
Company information |
Company information |
CRM SSO List |
|
|
Display Name |
Original Name in App |
|
Pipeline |
Pipeline |
|
Company Information |
Company information |
|
SSO Information |
SSO information |
|
Attachments |
Attachments |
|
Status |
Status |
CRM Note List |
|
|
Display Name |
Original Name in App |
|
Basic |
Basic |
|
Category |
Category |
|
Contact information |
Contact information |
|
Attachments |
Attachments |
CRM Meeting Report List |
|
|
Display Name |
Original Name in App |
|
Basic |
Basic |
|
Customer satisfaction |
Customer satisfaction |
|
Economic trends |
Economic trends |
|
Contact information |
Contact information |
|
Attachments |
Attachments |